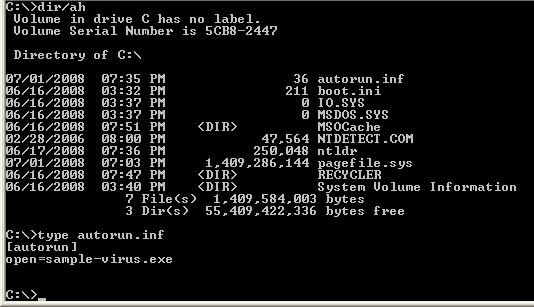
The autorun.inf file is a worm which spreads all over your partitions by creating a copy of itself and comes usually comes from USB flash drives . It won't let you access your drives by giving you an autorun menu when double clicking on your c: or your usb flash drive.
This is the standard procedure to delete the Autorun.inf file
Normally when a virus infects a windows system which causes a drive opening problem, it automatically creates a file named autorun.inf in the root directory of each drive.
This autorun.inf file is a read only ,hidden and a system file and the folder option is also disabled by the virus. This is deliberately done by the virus in order to protect itself. autorun.inf initiates all the activities that the virus performs when you try to open any drive.
You have to just delete this file and restart your system to correct this problem.
Follow the set of commands below to show and delete the autorun.inf
1. Go to Start then Run and type cmd and press enter. This will open a command prompt window. On this command prompt window type the following steps.
2. type:
cd\ press enter
3. type
attrib -r -h -s autorun.inf press enter
Please note the spacing:
no space between the dash and the letter and a space after the r h and s
4. type
del autorun.inf press enter
If the PC returns a "file not found" message - check the spelling for autorun.inf
5. if you have a d drive: type d: and press enter for d: drive partition. Now repeat steps 3 and 4. Similarly repeat step 5 for all your hard disk partition.
Restart your system and your trouble will be fixed. Except the program that caused the problem is still in your computer.
Make sure you are connected to the Internet and download Malwarebytes' Anti-Malware program.
Double-click on Download_mbam-setup.exe to install the application. When the installation begins, follow the prompts and do not make any changes to default settings. When installation has finished, make sure you leave both of these checked:
Update Malwarebytes' Anti-Malware and launch Malwarebytes' Anti-Malware, Then click Finish. MBAM will automatically start and you will be asked to update the program before performing a scan. If an update is found, the program will automatically update itself. Press the OK button to close that box and continue.
On the Scanner tab:
Make sure the "Perform Quick Scan" option is selected. Then click on the Scan button.
The next screen will ask you to select the drives to scan. Leave all the drives selected
and click on the Start Scan button. The scan will begin and "Scan in progress" will show at the
top. It may take some time to complete so please be patient. When the scan is finished, a message box will say "The scan completed successfully. Click 'Show Results' to display all objects found".
Click OK to close the message box and continue with the removal process. Back at the main Scanner screen, click on the Show Results button to see a list of any malware that was found.
Make sure that everything is checked, and click Remove Selected. When removal is completed, a log report will open in Notepad and you may be prompted to restart your computer. (see Note below) The log is automatically saved and can be viewed by clicking the Logs tab in MBAM.
Note:
If MBAM encounters a file that is difficult to remove, you will be presented with 1 of 2 prompts. Click OK to either and let MBAM proceed with the disinfection process.
If asked to restart the computer, please do so immediately. Failure to reboot will prevent MBAM from removing all the malware.
~kioskea, xpcman